Case study / Doctor’s explanation
Face and Neck Rejuvenation Through a Case Study
In this case, I share how I assess the face and neck together, the surgical plan we developed and images three months after surgery.
Face and neck • Case explanation · 2 min 47 sec
Follow the explanation
Video chapters
English chapter summaries. Select a chapter to watch.
In this patient, I assess cheek volume, the lower eyelid–cheek transition, the area around the mouth, the jawline and neck together.
We transferred fat to the tear trough and cheek region, aiming to support cheek volume and soften the lower eyelid–cheek transition.
We performed an extended deep plane facelift, lifted deeper tissues together and also addressed the platysma muscle in the neck.
In the images taken three months after surgery, I assess the cheek, lower eyelid–cheek transition, jawline and neck.
From facial assessment to month three
English translation of the existing Turkish adaptation of Assoc. Prof. Mehti Şalvız’s video explanation; not a verbatim transcript.
Cheek volume and its relationship with the lower eyelid
Let us examine this patient’s face together. The first finding I notice is loss of cheek volume. When younger, the cheek sits higher and supports the lower eyelid. With age, it loses volume and gradually moves downwards.
When the cheek moves down, the tear trough deepens, the lower eyelid–cheek transition becomes more pronounced and the eye area starts to look more tired. When assessing this patient’s under-eye appearance, I also look at cheek volume and position. The relationship between these regions is part of assessing the face as a whole.
Changes from the mouth area to the jawline
Downward cheek movement also deepens the nasolabial folds running from the sides of the nose to the mouth corners. It contributes to more prominent marionette lines below the mouth corners. In this patient, I consider cheek changes together with the appearance around the mouth.
As ageing continues, downward tissue movement also affects the jawline. It loses definition and sagging appears in the lower face. Here we see connected changes extending from the cheek through the mouth area to the jawline.
Neck assessment and a comprehensive plan
In the neck, the platysma becomes lax, moves downwards and starts to gather at the midline. This softens the angle between the chin and neck and makes the neck look heavier. I also consider this muscle when assessing the neck.
All these findings are related. Changes in the cheek, jawline and neck are parts of the same ageing process. We therefore developed a treatment plan for this patient that considered the whole face and its relationship with the neck together.
The volume and transition targeted by fat transfer
First, we transferred fat to the tear trough and cheek. Our aim was not simply to fill the tear trough; we also wanted to restore support to lost cheek volume.
We aimed for a softer transition between the lower eyelid and cheek. We therefore considered the tear trough and cheek volume together when planning fat transfer. At this stage of the plan, we addressed the initially assessed lower eyelid–cheek relationship in terms of volume.
Extended deep plane and lifting deeper tissues together
As the second step, we performed an extended deep plane facelift. We released supporting ligaments holding the tissues and lifted the deeper facial tissues together. By lifting these structures, we restored midface support, improved the appearance of nasolabial folds and marionette lines, and achieved a more defined jawline.
We continued in the neck and also addressed the platysma. Our aim was to reshape neck contour and better define the chin–neck angle. Repositioning the deeper facial tissues and adjusting the neck were continuations of the same plan.
My assessment at three months
Now let us look at the images three months after surgery. The cheek looks higher and fuller. The tear trough is softer, and the transition between lower eyelid and cheek is smoother.
We also see improvement in the nasolabial folds and marionette lines. The jawline is clearer and neck contour more defined. We are looking again at the cheek, eye area, mouth area, jawline and neck assessed initially, this time together in the three-month images.
Using tattoos as positional reference points
One feature I particularly want to highlight in this case is my patient’s tattoos. They provide a useful reference for following tissue position. Their positions in the images make it easier to see how tissues were moved and lifted.
Overall, the face looks younger, refreshed and rested. This appearance comes from repositioning deeper structures, rather than pulling the skin tightly. In assessing this case, I consider the starting anatomical findings, our surgical plan and the three-month images together.
Two views of the same case
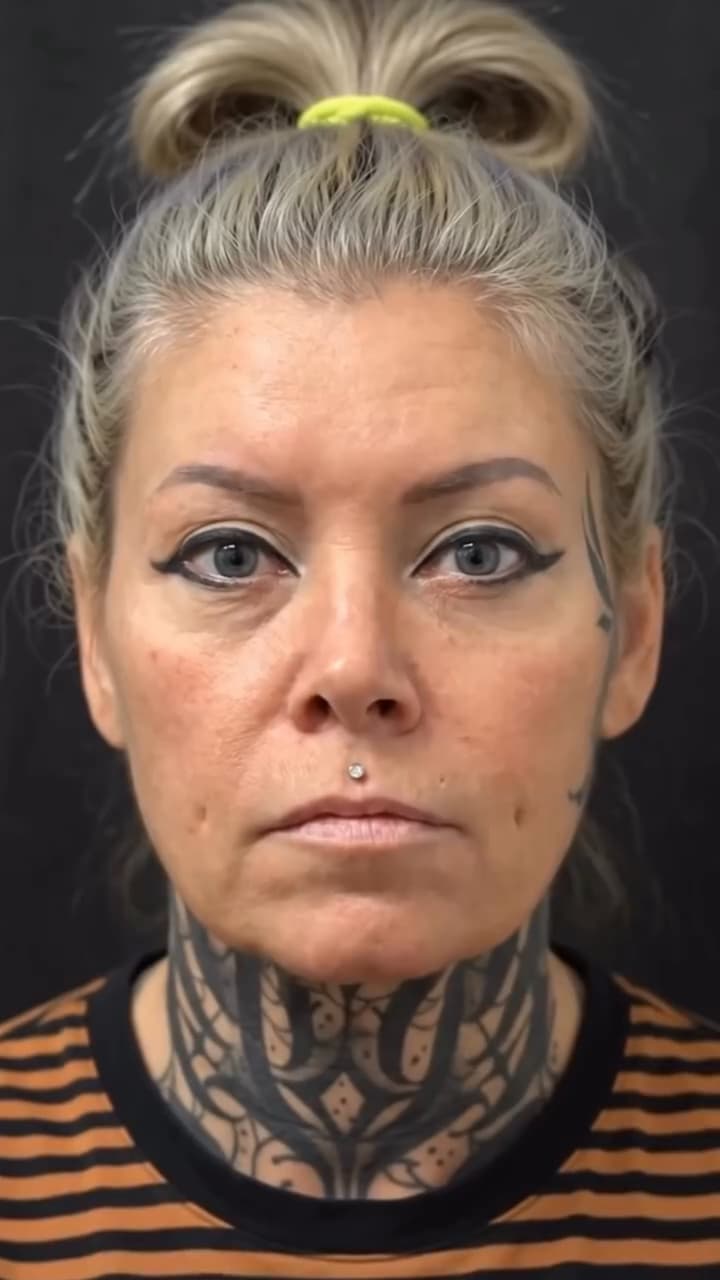

Images are taken from the same case video. “Month 3” is based on the doctor’s narration; camera angle and lighting may differ. Images of one case do not mean another person will achieve the same result.